Sale!
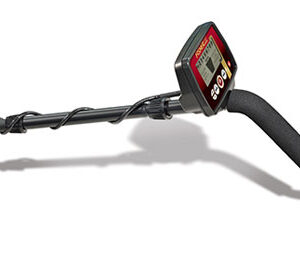
Vishco Magic Pro V3i Metal Detector
₹65,000.00 ₹70,000.00
10 in stock (can be backordered)
Description
Vishco Magic Pro V3i Metal Detector
Thank you for choosing our Metal Detector Vishco Magic Pro V3i. Please read this manual carefully and become familiar with the function of Vishco Magic Pro V3i before use. After reading, please keep it safe for future reference.
- Vishco Magic Pro V3i is used outdoors. There is too much interference indoors.
- In the higher sensitivity range, the detector will be more sensitive to electromagnetic interference. By reducing sensitivity you can get rid of interference.
- When detecting, move the search coil at a constant speed. Let the search coil be parallel to the ground and about 1/2 inch from the surface, do not swing it like a pendulum.
- The depth indication is accurate for coin-sized objects. Large objects or irregularly-shaped objects will reduce accuracy.
- Most of the valuable metal objects will send consistent signals. If the signal isn’t consistent, it’s mostly a false signal.
- Please use two 9-volt alkaline batteries.
Open the battery cover and install the battery according to the polarity sign in the battery box. If you are not going to use the detector for a long time, please remove the battery from the battery case.
OPERATION and CONTROL-an overview
MENU
The Menu is located on the left side of the screen. During normal operation
the Menu is faded and inactive.
Use “<” and “>” to select a Menu option. Menu options are:
Sens (Sensitivity)
VOL(Volume)
Ground (Manual Ground Cancellation)
Disc-L (Disc-Level: Discrimination)
V-B (V-Break: Change audio for certain targets)
Notch-W (Notch Width)
Notch
Use “+” and “–” to modify the setting of the selected Menu option.
Not all Menu options are available in all Modes.
MODES
The detector can be operated in any of 7 different modes. Each of these modes calibrates the operating parameters of the detector to different skill levels, applications, or environments. Different Modes can be used for different detecting objectives and to best adapt to various ground and treasure conditions.
Push the MODE button to access any one of these:
DISC C (Coins)
DISC J (Jewelry)
DISC A (Artifacts)
DISC 2 (2 tones)
DISC 3 (3 tones)
DISC 4 (4 tones)
ALL METAL (V.C.O.)
Settings Memory
When the detector is powered off settings are saved, except for the ground setting.
How to reset to the factory default setting (if desired)
- Power detector off.
- Press-and-Hold MODE.
- Press while holding MODE down.
- The software version is indicated on the screen.
- Release MODE; detector turns on and all settings are restored to the factory defaults.
All Metal Quick-Switch
In any DISC Mode, press-and-hold MODE to temporarily activate the ALL METAL Mode. Release MODE to return to DISC.
MENU
The Menu is located below the screen. During normal operation, the Menu is inactive and faded.
Use “<” and “>” to select a Menu option. The option selected is marked by “ˇ”.Once a menu option is selected, the setting can be changed using “+” and “–”.Not all options are available in all Modes. Here is a description of the Menu options:
SENS
Adjust the sensitivity from 1 to 10. The higher the number, the more sensitive the detector. This sensitivity control does not affect Pinpoint sensitivity.
If the detector beeps erratically or beeps when there are no metal objects being detected, reduce the sensitivity.
The search coil produces a magnetic field and then detects changes in that
magnetic field caused by the presence of metal objects. This magnetic field that the detector creates is also susceptible to electromagnetic energy (EMI) produced by other electronic devices. Cell phones, cell phone towers, etc… all produce EMI which can interfere with the detector and cause it to beep when no metal is present, and sometimes to beep erratically.
VOLUME
Adjust speaker volume from 0 to 10. The Volume control changes the loudness of the audio when targets are detected, and also the loudness of the keypad presses and warning sounds.
GROUND
Adjust the Ground setting from 0 to 99. This provides for manual adjustment of the detector’s internal ground setting, which you will usually want to set at the same value as the soil’s Ground Phase value.
See the Ground Cancellation section of the manual for an explanation of the Ground Phase.
When adjusting the Ground setting manually, the Conductivity Arc across the top of the display graphically displays both the detector’s internal ground setting and the actual phase of the ground.
– The black segment represents the detector’s internal ground setting.
– The opposite end of the faded arc is the actual Phase of the soil.
– If only a black segment is displayed, with no faded segments, then the detector’s ground setting is equal to the soil’s Phase.
Note that when adjusting the Ground setting, the displayed setting changes by 1 number only after 10 keypad presses. The detector actually has 1,000 different ground settings to choose from but uses only 2 digits to display the number. The reasons for this manual ground cancellation feature are explained in the Ground Cancellation section of the manual.
The Ground menu option is only available in the All Metal Mode. In all other modes, the Ground menu option will not appear on the screen.
GROUND (continued)
The Ground setting is the only user setting that is not saved when the detector is powered off.
The user’s manual Ground setting carries over into the DISC 2, DISC 3, and DISC 4 modes, but does NOT carry over into DISC C, J, and A modes. In DISC C, J, and A modes, the Ground setting is fixed at 82.
DISC LEVEL
Available settings from 0-59. All targets with IDs less than or equal to the Disc Level setting are eliminated from detection. For example, if Disc Level is set to 39, all targets with an ID of 39 or less will not be detected. By design, the detector does not allow highly conductive targets (like silver) to be discriminated out.
V-BREAK
This is a feature that allows the user to change the audio response of certain
targets. V-Break allows the user to program the detector so that any target
with an ID in the range of 0 – 69 can induce a LOW tone.
Examples:
The user sets V-Break to a desired setting (e.g. 42).
Every target with an ID less than or equal to 42 induces a low tone.
The audio response of targets with IDs greater than 42 is not changed.
V-Break can be set only for Target IDs that have not previously been rejected using the Discrimination or Notch functions.
NOTCH WIDTH
As you press or when adjusting the Notch Width setting, the blank area
you see across the Conductivity Arc represents targets that will not be
detected. This blank area is the “notch window.”
Notch Width allows you to set the size (or width) of this notch window, which
can be used to “notch out” or “notch in” targets from detection; the maximum
width of the notch window is 20.
NOTCH
After setting the width of the notch window, it can be moved around using
NOTCH. The setting you adjust corresponds to the leftmost edge of the notch window. It is not possible to move the window below 20; iron (IDs below 20) cannot be notched. If iron values are eliminated with Disc Level programming, they cannot be notched back in. The notch can be used in DISC 2, 3 & 4 modes.
BATTERY
The detector requires two 9-volt ALKALINE batteries.
Do not use ordinary “Zinc Carbon” batteries
Do not use “Heavy Duty” batteries.
Rechargeable batteries can also be used. If you use rechargeable, we
recommend using a “Nickel Metal Hydroxide” rechargeable battery.
BATTERY LIFE
Expect 15 to 20 hours of life
10-SPEAKER VOLUME AND BATTERY CHARGE
You may notice the speaker volume drop while one battery segment is
illuminated. With the outline flashing, low speaker volume will be very apparent.
BATTERY DISPOSAL & RECYCLING
Alkaline batteries may be disposed of in a normal waste receptacle or
recycled. Other battery chemistry should be recycled.
Cautions:
- Do not mix the old and new batteries or different types of batteries.
- If you don’t plan to use the unit for a week or more time, remove the batteries. Batteries can leak chemicals that can destroy electronic parts.
HEADPHONE JACK
This detector has a 1/8” headphone jack. When the headphone jack is connected, the speaker volume is disabled. Using headphones extends battery life and prevents the sounds from bothering bystanders. Headphone use also facilitates the detection of the weakest signals.
For safety reasons, do not use headphones near traffic or where other dangers are present.
QUICK-START DEMONSTRATION
Ⅰ.Supplies Needed
- Nail (made of iron) • U.S. Quarter (or silver coin) • U.S. Nickel
Ⅱ.Position the Detector
a.Place the detector on a table with the search coil hanging over the edge(or,
have a friend hold the detector with the search coil off the ground).
- Keep the search coil away from walls, floors, and metal objects.
- Remove watches, rings, and jewelry.
- Turn off lights or appliances whose electromagnetic
emissions may cause interference.
- Pivot the search coil back.
- Reset detector to default settings:
with detector OFF,
Press-and-Hold “M”. Press.
Ⅲ. Demonstrate COIN MODE:
- If the display does not indicate “DISC C”, repeat step II.f. above.
You are now in the preset Coin Mode.
- Wave objects over the search coil. Wave coins flat, parallel to the search coil.
Notice the different sounds and 2-digit Target-IDs while you wave each
object over the search coil:
High Tone: Dime, Quarter & Silver Coin
Medium Tone: Nickel, larger Gold Rings
Low Tone: Zinc Penny, smaller Gold Rings
The Nail will not be detected in COIN MODE.
Ⅳ. Demonstrate DISCRIMINATION MODE:
(This demo uses the DISC 2 Mode. There are other discrimination modes.)
a.Push “M” until DISC 2 appears on the lower right of the display.
b.Wave the nail; it is now detected. Notice the low tone.
c.Wave all other objects over the search coil. They all induce the same sound but have different Target-IDs. Notice V.C.O. change as objects move closer or farther from the search coil.
d.Push“>” until “DISC- L” is highlighted.
e.Push “+”until “19” is displayed.
f.Wave nail. It will not be detected because it has been” discriminated out”.
g.Press“+” until “59” is displayed.
h.The Penny and Nickel will not be detected. They have now been
“discriminated out.”
Ⅴ. Demonstrate PINPOINT feature:
a.Press and hold .“PP” momentarily appears on the screen.
b.Hold a coin motionless over the search coil.
c.Lower the coin toward the search coil and then raise the coin away from the search coil.
d.Notice the sound changes as the coin distance varies.
- Notice the depth indicator changes as the coin moves up and down.
THE BASICS OF METAL DETECTING
This metal detector is intended for locating buried metal objects. When searching for metals, underground or on the surface, you have the following challenges and objectives:
1. Ignoring signals caused by ground minerals.
2. Ignoring signals caused by metal objects that you do not want to find,
like nails.
3. Identifying a buried metal object before you dig it up.
4. Estimating the size and depth of objects, to facilitate digging them up.
5. Eliminating the effects of electromagnetic interference from other
electronic devices.
Your metal detector is designed with these things in mind.
1. Ground Minerals
All soils contain minerals. Signals from ground minerals can interfere with
the signals from metal objects you want to find. All soils differ and can differ greatly, in the type and amount of ground minerals present. You, therefore, want to “calibrate” the detector to the specific ground conditions where you are hunting. The detector incorporates both automated and manual ground cancellation features which will eliminate false signals caused by most types of soils. If you want to maximize the detector’s target identification accuracy and depth of detection, use the GROUND Cancellation Computerized Ground Cancellation function to calibrate the detector to the ground where you are searching. See the section on Ground Cancellation for details.
2. Trash
If searching for coins, you want to ignore items like aluminum foil and nails. You can see the Target-ID of the buried objects, listen to the sounds, and then decide what you want to dig up. Or, you can eliminate unwanted metals from detection by using the different Modes or NOTCH features or use the Custom mode to create your own discrimination settings.
3. EMI (Electromagnetic Interference)
The search coil produces a magnetic field and then detects changes in that magnetic field caused by the presence of metal objects. This magnetic field the detector creates is also susceptible to the electromagnetic energy produced by other electronic devices. Electric fences, cell phones, cell phone towers, power lines, microwave ovens, lighting fixtures, TVs, computers, motors, etc., all produce EMI which can interfere with the detector and cause it to beep erratically.
The SENSITIVITY control lets you reduce the strength of this magnetic field and therefore lessen its susceptibility to EMI. You may want to operate at maximum strength, but the presence of EMI may make this impossible, so if you experience erratic behavior or”false” signals, reduce the sensitivity.
USING THE DETECTOR
Sweep Method
Sweep the detector side-to-side over the ground. Keep the search coil parallel to the ground as you sweep; do not lift the search coil at the ends of your sweeps. Search coil motion is required for target detection. (except when using Pinpoint).
OPERATING MODES
DISC C
This preset mode is configured for coin-hunting.
Iron, foil, and aluminum are not detected.
Tones are: Low – zinc
Medium – U.S. Nickels
High – 10¢, 25¢, 50¢, $1 and silver
Sensitivity and Volume settings can be adjusted. The Ground setting is preset to 82 and cannot be adjusted.
DISC J
This preset mode is configured for jewelry-hunting.
Iron is not detected.
Tones are: Medium – most gold and small silver
High – silver
Sensitivity and Volume settings can be adjusted. The Ground setting is preset to 82 and cannot be adjusted.
DISC A
This preset mode is configured to hunt for artifacts.
Small iron objects are not detected.
Large iron objects are detected.
Tones are: Low – iron
Medium – foil, nickels, aluminum, zinc, and most gold
High-copper and silver
Sensitivity and Volume settings can be adjusted. The Ground setting is preset to 82 and cannot be adjusted.
DISC 2 , 3, and 4 can be used with the V-Break, Disc Level, Notch and
Ground controls. Select your preferred mode depending on the number of
tones you want to hear.
DISC 2 (two tones)
Tones available are low and V.C.O. The V-Break setting determines the range of Target-IDs that induce low tones. The factory default V-Break setting is 19; unless adjusted, all iron will induce low tones.
DISC 3 (three tones)
This model is the same as DISC 2, with the addition of a high tone for highly
conductive targets.
DISC 4 (four tones)
This model is the same as DISC 2, with the addition of a high tone for highly
conductive targets and a medium tone for nickels.
ALL METAL
This mode does not allow for the rejection of any targets. Many treasure hunters
prefer All Metal when hunting grounds with little trash metal present.
Audio is V.C.O. for all targets.
PINPOINT
PINPOINT
Press and hold to activate the Pinpoint feature. Search coil motion is not required; a motionless search coil over a metal target will induce sound.
Audio is V.C.O.The 2-digit number displayed indicates the target depth, in inches. The scale is calibrated to coin-sized objects. After you have identified a target using a motion mode of detection, press and hold the to identify the target’s exact location. This technique can yield more information about the target’s shape and size and find its exact location to facilitate extraction.
Pinpoint as follows:
1. Press and hold
2. Position the search coil just barely off the ground and to the side of the target.
- Now move the search coil slowly across the target, and you can locate it by the sound.
The target is located directly under where the sound is loudest.
Narrow It Down:
- To narrow the response further, position the center of the search coil near the center of the response pattern, but not directly over the center.
- Release.
- Immediately press and hold again.
- Repeat this narrowing procedure to narrow the field of detection further.
Note: Depth indication is less accurate after narrowing.
COIL DRIFT
If you plan to use PINPOINT for continuous searching, realize that drift will
occur over time, causing the detector to gain or lose sensitivity. Periodic
re-tuning of the detector is required to minimize drift; release and press
periodically to re-tune.
PINPOINTING USING MOTION MODES (without using )
1. Sweep over the target in narrowing side-to-side patterns.
2. Take note of the spot on the ground where the “beep” occurs.
3. Step 90° to the side of the target.
4. Sweep search-coil over the same area, at 90° to the 1st sweep pattern.
5. This pinpoints the target location with an “X”.
GROUND CANCELATION
WHAT IS GROUND CANCELATION?
Why do I need to cancel out the ground?
All soils contain minerals. Signals from ground minerals are often tens or hundreds of times as strong as the signal from a buried metal object. The magnetism of iron minerals, found in nearly all soils, causes one type of interfering signal. Dissolved mineral salts, found in some soils, are electrically conductive, causing another type of interfering signal.
Ground Cancellation is the process by which the metal detector cancels the unwanted signals coming from the ground minerals while still detecting the signals from buried metal objects. This is accomplished by matching the detector’s Ground setting to the Phase of the ground signal.
When the detector is calibrated to the soil, the result will be deeper target detection, quieter operation, and more accurate target identification.
The most accurate GROUND value is the value displayed when “pumping” the search coil over the ground in an area free of metal.
Ground Grab Computerized Ground Cancellation:
This control allows you to set the detector’s internal ground setting equal to the Phase of the ground you are searching over.
Press and hold to invoke automatic ground cancellation. This will “grab” the ground value and store it in the detector.
In order to calibrate the detector to the most accurate ground value, pump the search coil up and down over the ground while standing in one place over a patch of ground free of metal.
1. Press and hold.
- The display will indicate “Pump Coil.”
- Start with the search coil 6” above the ground; lower it to about 1” from the ground. Continue the pumping motion until the 2-digit number stabilizes and no faded segments are visible on the Conductivity Arc. At the point where the 2-digit number stops changing, the detector has correctly measured the ground Phase.
- Immediately release to set the detector’s internal ground setting equal to the last value displayed. During GROUND GRAB, the detector jumps into ALL METAL operation. The sound you hear is the sound of the ground. Ground Grab cannot be invoked from DISC C, J, or A.
GROUND BALANCING
MANUAL GROUND ADJUSTMENT
Refer to the GROUND section of the manual for instructions on how to manually adjust the detector’s internal Ground setting.
If the Ground setting is incorrect, there will be a difference in the sound as
the search coil is either moving toward or away from the ground. It sounds
like you are either pulling the sound out of the ground or pushing the
sound into the ground.
- If the sound gets louder as you raise the search coil, increase the Ground setting.
- If the sound gets louder as you lower the search coil, reduce the Ground setting.
NOTE: Experienced users often prefer to adjust the Ground setting to
get a weak but audible response when lowering the search coil. This is
called “adjusting for positive response.”
DEPTH AND TARGET DISPLAY
Please refer to the display on your detector and reference the TARGET-ID categories below applicable to your model (not all detectors include all of these categories).
READING THE DISPLAY
The display shows the PROBABLE identification of the metal detected, as well as its PROBABLE depth.
The detector will register a target identification, upon each sweep of the search coil, when a buried target has been located and identified. If, upon repeated passes over the same spot, the target identification reads inconsistently, the target is probably a trash item. With practice, you will learn to unearth only the repeatable signals.
The segment identifications are highly accurate when detecting the objects described on the face plate. However, if an object registers in a given category for an unknown buried object, you could be detecting a metallic object other than the object described on the face plate, but with the same metallic signature. Also, the greater the distance between the target and the search coil, the less accurate the target identification.
GOLD TARGETS Gold objects will generally register toward the middle or
left-of-center on the scale.
Gold flakes will register under the iron.
Small gold items will register under foil or 5¢.
Large gold items will register toward the center of the scale.
SILVER TARGETS: Silver objects will register to the right of the scale, under dime or higher.
IRON: All sizes of iron objects will register on the far-left side of the scale.
This could indicate a worthless item such as a nail, or a more valuable historic iron relic.
FOIL: Aluminum foil, such as a gum wrapper, will register as a foil. A small broken piece of the pull tab may also register here.
5¢: Most newer pull tabs from beverage cans, the type intended to stay attached to the can, will register here. Many gold rings will also register here.
ALUM: Older pull tabs, which always detached completely from the can, register here. Many medium-sized gold rings also register here.
PT (pull-tabs): Pull-tabs from older beverage cans will register here. A few newer pull tabs will also register here. Many gold rings will also register here.
- CAP: Older screw caps from glass bottles will register here. Large gold rings, like a class ring, could also register here. Some non-U.S. coins of recent vintage will also register here.
Zinc: Medium conductivity objects and many non-U.S. coins of recent vintage are classified here. The Target Identification Categories to the right of the display, such as 10¢, DIME, 25¢, Quarter, 50¢, and $1 accurately identify these U.S. coins. When used in areas outside the U.S., these categories identify coins or metal objects of high relative conductivity (such as silver coins or relics), or large objects made of any type of metal.
Caution: The target indications are visual references. Many other types of metal can fall under any one of these categories. While the detector will eliminate or indicate the presence of most common trash items, it is impossible to accurately classify ALL buried objects.
TROUBLESHOOTING GUIDE
| TROUBLESHOOTING GUIDE | ||||
| SYMPTOM | CAUSE | SOLUTION | ||
| Detector chatters beep erratically or has low sensitivity | • Using detector indoors • Using detector near power lines • Using 2 detectors in close proximity • Environmental electromagnetic interference | • Use detector outdoors only • Move away from power lines • Keep 2 detectors at least 6 meters (20’) apart • Reduce sensitivity until erratic signals cease | ||
| Do not mix old and new batteries. Use alkaline batteries. Do not mix alkaline, standard (zinc-carbon), or rechargeable (NiCad, NiMH, etc.) batteries. | ||||
| Low speaker volume | • Discharged battery • Wrong type of battery | • Replace battery • Use alkaline batteries | ||
| The display does not lock on to one Target ID or the detector emits multiple tones | • Multiple targets present • Highly mineralized soil • Sensitivity set too high | • Sweep coil at different angles • Move to a different area • Reduce sensitivity | ||
| No power, no sounds | • Dead battery • Cable not connected securely | • Replace batteries • Check connections | ||
Factors That Affect The Detecting
It’s difficult to have an accurate detecting result. Sometimes the detecting
maybe restricted by some factors.
- The angle of the target buried in the soil.
- The depth of the target.
- The level of oxidization of the target.
- The Size of the target.
- Electromagnetic and electrical interference surrounding the target.
Related Products
Fisher F75+ Limited Edition Metal Detector, Gold Detector with 11″DD Coil and 15″ DD Combo Pack
Availability : 2 In Stock
₹150,000.00
White’s Spectra V3i Advanced 2D Graphical Target VDI Gold Metal Detector
Availability : 0 In Stock
₹180,000.00 Read more
Vishco Gold Pro 18kHz Metal Detector Complete Combo Pack
Availability : In Stock
₹105,000.00 Read more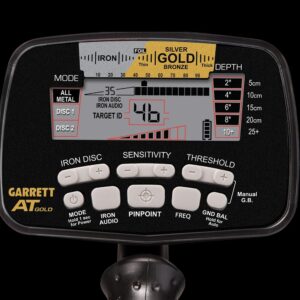
White’s TM 808 Deep Underground Metal Detector Depth up-to 15-20 Feet
Availability : 0 In Stock
₹120,000.00 Read more

Fisher Gemini 3 Deep buried Treasure Detector Depth Upto 15ft
Availability : 0 In Stock
₹180,000.00 Add to cart